Monday, June 29, 2009

Mini Printable Box


This is the cutest tiny box. I printed it as is and cut out, but next time I will enlarge it a bit and print on paper heavier than printer paper. The printable is from Babalisme. Go on over and visit her blog. There are several other fun printables to check out. She also has a postcard to match this great little box.
Happy Monday everyone!

Friday, June 26, 2009

Terrarium Picture Frame


In my efforts to find crafty activities for an 11 yo, I was reading tweets and noticed one from Jennifer Perkins (Naughty Secretary Club fame) indicating she was featured on Dollar Store Crafts and had created this tutorial. I think that an 11 yo boy would love to find treasures...rocks, shells, plastic men, etc. and put in a shadow box frame to hang or set in his room.

You can find the tutorial HERE and obviously when the 11 yo gets his completed, I'll post the pictures.

Thursday, June 25, 2009

Button Bow for Dog Collar

Some of you may or may not know that I have two dogs. One is a spaniel mix and the other a very male shitzu. I say very male because he is kind of like a bulldog and plays just as rough as the spaniel. I know the spaniel would probably love this bow on his collar, but I'm not sure about the shitzu. It would look cute on both and looks very easy to make. So all you dog folks, get out your ribbon and make your dog a bow for his collar. Here are pics of Buddy the spaniel and Leo the shitzu.
Instructional video is courtesy of Suzanne from Texas who has posted two videos, one on how make the bow and the other on adding the button, link HERE. She also has an Etsy shop at http://crazyforcollars.etsy.com/.

Tuesday, June 23, 2009

Artsy Bulletin Boards


While searching the Better Homes and Gardens for kids craft ideas, I came across this one that if not used for kids would be great in a kitchen, office or craft room and provide a bit of artsy decor along the way, especially if you want to highlight some of your photos.

Artsy Bulletin Boards
Use photos and a snippet from a letter written home to create artsy bulletin boards made from cork trivets.
From the magazine, Creative Kids

What You Need:
Computer/printer
Photo
Iron
Iron-on transfer paper
Light-color cotton or cotton-blend fabric
Spray adhesive

Instructions:
1. Scan a photo and letter into your computer. Enlarge and crop them to fit the trivets. Print the images onto iron-on transfer paper. Iron the paper onto light-color cotton or cotton-blend fabric. (Dark fabrics require a special type of transfer paper.)
2. Use spray adhesive to affix the fabric to the cork, smoothing it and wrapping it neatly around to the back of the trivet.

Monday, June 22, 2009

Re Use for Old Spice Bottle Set


I have this spice bottle set on my counter and for the life of me, I don't know why. It won't fit in my cupboard, so maybe that is why it is on the counter. Well, it is time it went away and this great craft idea is just the ticket. I found this on the Better Homes and Gardens site under Crafts for Kids, but I think the bottles could be used for any small craft item such as ribbon remnants, beads, buttons, shells, etc. Just be sure your spice bottles do not have holes in the top, otherwise if sand is put in, sand will come out.

I'm watching my 11 year old nephew in July so I think he will just love this for his treasures.


What to do with sand, rocks, ocean water, and ticket stubs? Here's a clever solution kids will love.
From the magazine, Creative Kids

What You Need:
Spice rack and jars
Computer/printer
Colored paper
Cloud-shape scrapbooking punch
Spray Adhesive

Instructions:
1. Fill spice jars and create cute labels that tell what's what.
2. Use your computer to print words onto colored paper, punch out the words with a cloud-shape scrapbooking punch; affix the labels to the spice jars with spray adhesive.

Enjoy!

Saturday, June 20, 2009

Papered Switch Plates


Now we have all seen fancy switchplate covers at boutiques and craft shows and you can create them yourself. Martha Stewart.com has the instructions and these look easy enough, even I could do them.
Sometimes a switch plate is best when painted to blend with a wall. And sometimes a room gets a lift if you make one stand out: Cover with extra-wide ribbon, wallpaper, sheet music, or map of a favorite place.
Directions:
Trace switch plate onto back of paper.
Cut paper about 1/4 inch wider than outline
Brush craft glue onto back
Place switch plate face-down
Cut each corner at an angle slightly beyond corner of plate
Fold sides onto back of plate, using bone folder to smooth
With utility knife, cut X into paper covering switch cutout
Brush glue onto flaps; smooth to plate's back side
Make tiny X in paper covering screw holes. Turn over. Dab glue into holes. Use pin tip to push paper from front to back, opening holes.
(When mounted, the screws will hide minor imperfections.)
Seal paper with water-based urethane and if you used fabric spray with Scotchgard.
Sorry, there weren't any step by step photos, but it seems simple enough. If you make one or more of these, take some photos and I'll post them here as a reference to everyone.

Friday, June 19, 2009

Patriotic Poster Drink Charms


Don't we all have a 4th of July party coming up? We usually do something for the 4th...who knows maybe the beach again this year. These wine glass charms would be a great addition to the party even if it is just my husband and I...although usually at least one of the kids will come with the grandchildren. If you use mugs for Rootbeer or the real stuff, you could attach these to the handle so the kids aren't picking up each others drinks. It's not too late to make these for the party, so get out your stuff and start making them today.

Here is another photo of some of the images you can download off Flickr (see instructions below) or use your own pictures from previous 4th of July parties or patriotic images.
Instructions are on the Instructables site located HERE.
Enjoy, and have a safe holiday.

Wednesday, June 17, 2009

Messenger Bag Tote from BHG


From Better Homes & Gardens comes this great little Messenger Bag for quick errands or for everyday use.


Materials:
4 -- 1/8-yard pieces coordinating prints (flap)
1/2 yard red print (bag, strap)
1/3 yard green print (bag and flap linings)
12 x 50" thin cotton batting
1/4 yard fusible fleece
7 or more 10" lengths of ribbon, yarn, rickrack, or other trim
Assorted embellishments such as beads, charms, and antique buttons
Finished Bag:
7 1/2 X 8 1/4"
Quantities are for 44/45"-wide, 100% cotton fabrics. All measurements include a 1/4" seam allowance. Sew with right sides together unless otherwise stated.

Click here for Instructions.

For other fabulous tote bag directions here is the site: http://www.bhg.com/crafts/sewing/accessories/simple-to-sew-totes-purses-and-bags/?page=1.

Monday, June 15, 2009

Crocheted Stash Basket


If you love to crochet and you love baskets, guess what The Purl Bee has created a tutorial just for us. I can think of so many uses for this basket. How about in a guest bathroom with washcloths, fancy soap and other essentials that an overnight guest might forget. Although, I'm thinking that my vintage hankie collection would look great also and make a wonderful display piece. Go on over to The Purl Bee and check it out.
Have a great Monday crafters.

Saturday, June 13, 2009

Jewel Case Photo Box

I have lots of CD Jewel cases laying around with nothing in them, so I decided to try to find something to make with them. I found several ideas on what to do with them on Tip Junkie and decided to make a quick tutorial on what I plan to use them for.


What you will need for this project:
  • Jewel Cases (taken apart)
  • Padded (used) envelope or anything else to take up bulk
  • Pen
  • Ruler (optional)
  • Images (photos, collage, card, or whatever you want to display)
  • Scissors
  • Self Adhesive hangers (can be found in framing departments)


1. Start by sizing your images on your computer or just cutting them to size. I used the back paper of the CD case as a template. The size is 6 x 4 5/8" if you do not have one.
2. Gather all your supplies.
3. Cut your images to template size. Please note that the old one in the case has two folded ends. I folded my images but you don't have to.
4. Using your template mark where your fold lines will be.
5. Fold back your ends.
6. Test fit into the back of the plastic case, which will now become the front, and make any adjustments as needed. Be sure that your image is viewable from the case front.
7. Cut your padded envelope or cardboard to the inside size. You do not fold these ends. Fit inside the case on top of your image. You may sign and date or stamp the back with instructions or information about the photo or image.
8. Attach the back of the case. Almost done. Attach your self adhesive hanger.
9. Done - These are a few I made using photocopies of my watercolor paintings.
10. This one is a Alice In Wonderland image with embellishments.

Now all I have to do is find a place to hang them.
Enjoy!

Friday, June 12, 2009

Father's Day Craft Idea


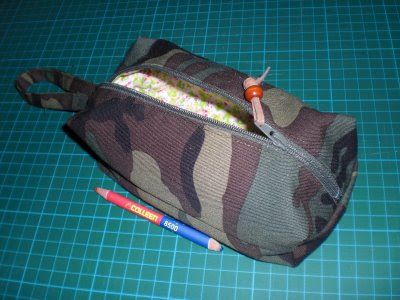
Here is a great tutorial for a boxy pouch....looks like something my dad would have used for all his shaving gear on a trip. Could be made in florals for a gift for mom, daughter or sister.

Take a trip over to Projects by Jane to check it out. Have fun.

Wednesday, June 10, 2009

Car Trash Bag


My car is such a pit a good part of the time. Empty water bottles just thrown in the back seat along with a empty latte cup, napkins from when I spilled the latte, receipts for gas and a slew of dog related junk, so I really need this for my car. Maybe I can get Ashley over at Make It and Love It to make me one, oh right, she puts these great tutorials out on her blog so YOU and I can make it. Okay, I promise to find that sewing machine and start sewing just as soon as I clean up my craft room again. I'm not a big sewer, but the directions look easy to follow. Try your hand and if you make an extra one, I'm in the market for one. Here is the link to the tutorial. http://makeitandloveit.blogspot.com/2009/04/trash-bag.html

Tuesday, June 9, 2009

Amy Butler Business Card Keeper


I found this pattern while perusing the Amy Butler site and drooling over her great fabrics. I have yet to pull my sewing machine out of storage, but I will as I collect all these great patterns and ideas. This would make a great gift idea for anyone that has to carry around business cards or a great idea would be to make this and give it to someone who doesn't carry business cards and make them some calling cards to go in it. My mom loves her calling cards and is always asking for more. They basically contain all the info that a business card would except a business name.


Monday, June 8, 2009

How to Make Map Butterfiles

Here I go again with another wall art project. This one is for butterflies made out of old maps although you could use just about any colorful paper like scrapbook or wallpaper scraps. Bromelaid's version, bottom photo and Image Surgery version top photo. Click HERE for Bromelaid's instructions and get creative.


Sunday, June 7, 2009

Great Wall Art Craft Idea

Looks like I'm into decorating my walls this Spring with all the ideas that I keep finding. Here is one from the Thrify Decor Chick - Sarah on using scrapbook paper and some wood.


Friday, June 5, 2009

Wall Design Idea


I just love these horses by Ann Wood.


In 2006 I started making cardboard horses. They were a self imposed assignment, a daily creative task intended to motivate and loosen me up, little experiments, paralysis prevention. My plan was to make a cardboard horse everyday, Monday through Friday until I had 100. I did and exhibited the group at Tinlark in Los Angeles in 2007. I’ve made 3 patterns, two adults and a colt, to share and I hope you make a cardboard horse or two or three or maybe a little family or maybe your own stampede! -Ann Wood


Check out the tutorial if you want to make your own horse stampede on your wall. I can just imagine these in a Boy's room. Another idea is to have the kids help you paint or color the horses.
Have fun and keep crafting.

Wednesday, June 3, 2009

Shaggy Loops Earring Tutorial


Diana Hudson is a crafter, photographer and all around jack of all trades. She is the owner of NightMaiden Designs and has created this tutorial for a simple chainmaille earring that has lots of possibilities. Check out the tutorial as I know I'll be trying these out as soon as I get me some of those jump rings....oh wait, I can make them when I find some time. As you can tell, I want to make everything in this blog so I'm going to be busy one of these days.
Visit her ArtFire shop to find some wonderful and colorful chainmaille styles of earrings, bracelets and necklaces.
Keep on Crafting.

Tuesday, June 2, 2009

Craft News - Upcoming Shows for the Weekend

Upcoming Craft/Art shows in the Pacific Northwest this weekend:

  • Puyallup Valley Gem & Mineral Show 06/05 to 06/07 2009 Fruitland Grange - Puyallup, WA
  • The Spring Art Show 06/05 to 06/07 2009 Stanwood Middle School - Stanwood, WA
  • Treasures in the Park 06/06 to 06/06 2009 3715 Bridgeport Way W. - University Place, WA
  • Tastin 'n' Racin 06/06 to 06/07 2009 Lake Sammamish State Park - Issaquah, WA
  • Maritime Gig Festival 06/06 to 06/07 2009 Skansie Brothers Park - Gig Harbor, WA
  • Medieval Faire 06/06 to 06/07 2009 various locations - Port Gamble, WA
  • Sedro-Woolley Blast for the Past 06/05 to 06/07 2009 Downtown - Sedro-Woolley, WA

Water Bottle Holder


It's almost Summer and I know we all need to carry water around with us when walking or even shopping. Here is a great tutorial from "Make It and Love It" to make a holder for a 16 oz water bottle. Now where did I put my sewing machine!
I'm sure that Ashley over at Make It and Love It would appreciate you checking out her blog and all the great ideas she has and if you make the water bottle holder....send us a pic as I would like to start a Flicker page with all these great craft photos.

Monday, June 1, 2009

Paper Fan


I remember growing up in the mid West and the high heat of Summer and wanting a fan so bad that you resorted to magazines and other paper items. Here is a fan you can make and carry with you when you are standing in line, at church, the grocery store or anywhere and you feel that heat wave. It is made with heavy weight paper or empty cereal boxes, then decorate with your own paper ....I know there are a lot of scrapbook artists out there with tons of paper. I have lots myself and I don't even have a scrapbook, but love the paper.

The design is from Cheeky Magpie and here is her web site with the instructions. http://www.cheekymagpie.com/?p=1259&cpage=1#comment-768. Enjoy and stay cool.